pleppink wrote:I believe I am just making the monitors. Those are the ones with just two drivers correct?
1. Ok I am going to start by working on the cabinets (crossovers next weekend.) I was wondering about the inner and outer cuts for the drivers. Is the surface between the cuts beveled or just straight?
2. Also there is a picture of a finished blues TM build on this forum that has rounded sides but as far as I can tell the instructions are for rectangular cabinets. Is that correct?
3. It says you are supposed to measure the drivers for the speaker cutouts. Where are you supposed to measure them?
4. Also it says for the inner tweeter cut out you need to save room for "ears for terminals" what does that mean?
5. The instructions give measurements for the "vent" is that the white rectangle in the upper right hand corner of the of the diagram for the side of the cabinet?
6. Is the back of the speaker cabinet just a solid piece of 3/4'' MDF? or should there be a cutout for some cords?
7. Will this cabinet need bracing? Is there any type of bracing you would recommend that wouldn't be too difficult for a novice builder?
Thanks for your help and sorry about all the questions, I just really want to make sure I am doing everything correctly and also learning about what I am doing.
I am not super familiar with woodworking terminology so hopefully you can understand what I am trying to say.
Thanks a lot,
Patrick
Congrats!! I hope you have fun with this build and enjoy the end results

. Are you replacing something you're currently using?
So regarding which one you're building, at least as far as I'm concerned a monitor is a bookshelf, and a floorstander is a tower speaker. So, a monitor could be either the TM (tweeter/mid) or a MTM (mid/tweeter/mid). So if I was telling someone what you were building, I would call it a "TM monitor". Some may disagree, but that's where I'm at

. You could actually build this as a monitor or a floorstander if you wanted; the kits (the actual speakers and crossovers) are the same, the difference is the cabinet. Obviously from a woodworking perspective the monitor is easier to build.
1. As far as the "surface between the cuts", are you referring to the 1/4" space that's between the woofer and tweeter? If yes, this remains flat with the rest of the baffle.
2. These were designed with a 1/4 to 1/2" roundover in mind. It's not critical, I honestly doubt you'll hear a difference to be honest. But, I do think it looks better if the front baffle has a roundover on the edges of the sides of the front baffle. Top and bottom edges don't matter at all if they're square or rounded edges.
3. I'll also answer the question in your second post here as well. For cutting the driver holes, in my opinion the Jasper circle cutting jig is the easiest way to do it. If you don't have one of these, I'd go to Woodcraft and buy one, they're about $35 I think. Pricey for a round piece of plastic, but they work incredibly well. You'll also need a 1/4" router bit to use with the Jasper jig.
As far as measuring the drivers for the cutouts... Measure the diameter of the very outside edges of the speaker's frame, then measure the thickness of the frame where the screw holes are (usually 3/16" to 1/4" for the woofer, but these aren't exact because I don't have a woofer here that isn't mounted to measure for you). The tweeter's depth is 3/32", I did have one of those here.
As far as the outer diameter of the speakers go... for the woofer, 6 11/16" is going to be tight, 6 3/4" will give you room to breathe. For the tweeter 3 15/16" is pretty good. That's the extreme outside edge of the speaker's frame, and this will be the first hole you route for the recess.
The 3rd measurement is for the actual cutout for the speaker to sit in the cabinet. What I generally do is measure the mounting flange's width, multiply that x2, then subtract it from the diameter of the speaker. For example, if the woofer's flange measured 7/16", I would subtract 7/8" from the 6 3/4" woofer diameter, and make the hole 5 7/8" (not saying 5 7/8" is what to use, you'll have to measure yours because I don't remember exactly what the woofers were.
4. Cutting "ears for the terminals"... Once you get the kit (or maybe you already have it) you'll see that the terminals for connecting the wires to the speakers are on the outside edge of the magnet. So when you cut your first hole for the recess, then cut the actual hole for the tweeter to fit in the cabinet, you'll find that the terminals are in the way of allowing to let the tweeter fit. You need to cut little spots out for these terminals to fit in. To do this I loosely place the tweeter in the hole I made, then mark where I need to cut out for the terminals with a pen or pencil. Then I carefully cut these out with the 1/4" router bit I used to route the other holes.
5. The vent (or port) is a black plastic 2" round tube that would come with the kit. I do my vents the same way I mount the speakers, so once the holes are all cut the vent is flush with the back baffle of the cabinet. I mount the vent in the rear baffle behind the tweeter.
6. The back of the cabinet is a solid piece of MDF, yes. But so is the front, the top and bottom, and the sides. The back of the cabinet will have the vent (or port) as well as the positive and negative connecting terminals mounted in it.
7. Bracing isn't super critical on a cabinet this small, but if I was building it I would put a "window brace" right in the middle, horizontally. You'll basically measure the inside of the cabinet's width and depth, then make the brace that size. Here's a picture of the window style braces in my Blues MTM tower speakers. Basically you'll put one of these braces right in the middle. If you do this, when you route out for your woofer, you'll see the brace runs right through your cut out and most router bits don't go that deep. I cut the rest of the brace with a jig saw after I router all the holes for the speaker (if this doesn't make sense, it will after you lay the cabinet out and start cutting).
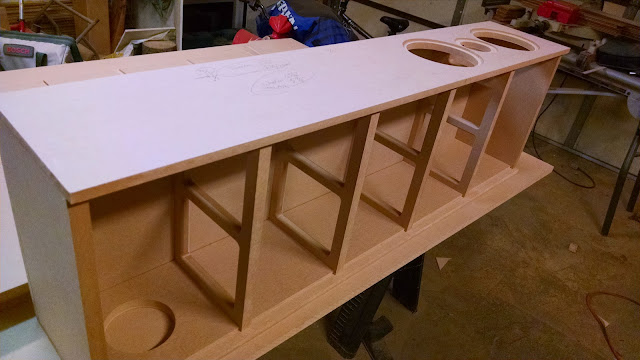
Looking at that^^ pic, you can see the hole for the port cut near the bottom. That's where the port goes in the floorstander, for your monitors that hole will be smaller, and towards the top of the cabinet right behind the tweeter.
Here's a picture of the finished speaker, just so you don't have to go to more than one place for info.

Have fun, and I really look forward to pics of the build, as well as how you like the way they sound